| How to solve the error "invalid target release: 17" | 您所在的位置:网站首页 › eclipse的error pages › How to solve the error "invalid target release: 17" |
How to solve the error "invalid target release: 17"
|
This article shows how to fix the compilation issue that you can hit when you are building an application which requires using Java 17 but it’s not compatible with your environment. Problem descriptionYou are trying to build a project, for example with Maven, which results in the following error: [ERROR] Failed to execute goal org.apache.maven.plugins:maven-compiler-plugin:3.10.1:compile (default-compile) on project demo: Fatal error compiling: error: invalid target release: 17 -> [Help 1]This is commonly due to using an incorrect version of the Java compiler or using a version of the Java runtime that is not compatible with the code. For example, if you are creating applications with the Spring Boot Initalizr, by default the project uses Java 17: 17On the other hand, you may have different environment settings. Firstly, check your current Java version: java -version openjdk version "11" 2018-09-25 OpenJDK Runtime Environment 18.9 (build 11+28) OpenJDK 64-Bit Server VM 18.9 (build 11+28, mixed mode)As you can see, your environment uses Java 11 which is incompatible with the project requirements. The simplest way to fix it is to export the JAVA_HOME environment variable so that it points to a valid JDK installation. For example: export JAVA_HOME=/home/java/jdk-17.0.2/To set the JAVA_HOME environment variable in Windows, follow these steps: Press the Windows key + R to open the “Run” dialog. In the “Run” dialog, type “sysdm.cpl” and press Enter to open the System Properties dialog. In the System Properties dialog, go to the “Advanced” tab and click the “Environment Variables” button. In the “Environment Variables” dialog, scroll down to the “System Variables” section and click the “New” button. In the “New System Variable” dialog, enter “JAVA_HOME” as the variable name and the path to your JDK installation as the variable value. Click “OK” to save the new system variable and close the dialogs. Solving the Java 17 compilation error with EclipseIf you are building your application from within Eclipse, you will need to apply the same concepts in the Eclipse configuration. To configure Eclipse to use Java 17, you will need to have that version of the Java Development Kit (JDK) installed on your computer. Then, follow these steps to configure Eclipse to use it: Firstly, start Eclipse and go to the “Properties” menu. In the Properties window, go to “Java Build Path” and then select the Installed JRE from the Libraries tab: 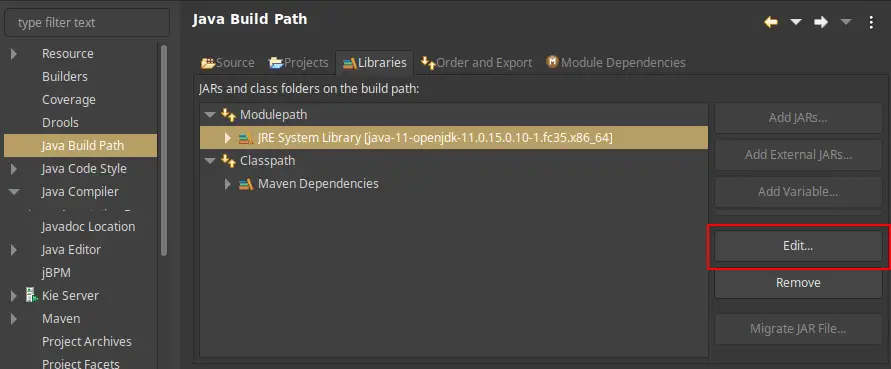
Click Edit to Change the default JRA. In the following screen, select “Alternate JRE” and click on “Installed JRE“: 
In the next screen, select the JDK 17 – if that is available – or Add the JDK 17 as new installation. Back to the Edit Library window, now choose Java 17 as Alternate JRE: 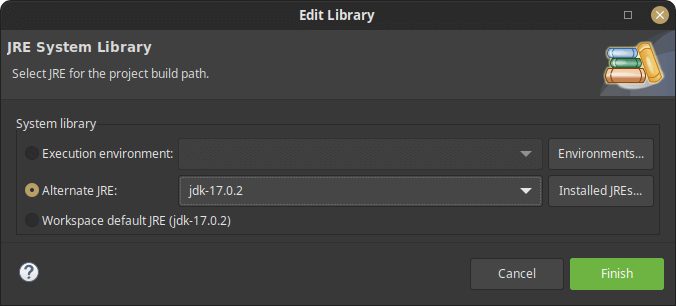
Finally, when you are building your application from Eclipse, make sure that the Run Configuration includes, in the JRE Tab, the Workspace default Java 17: 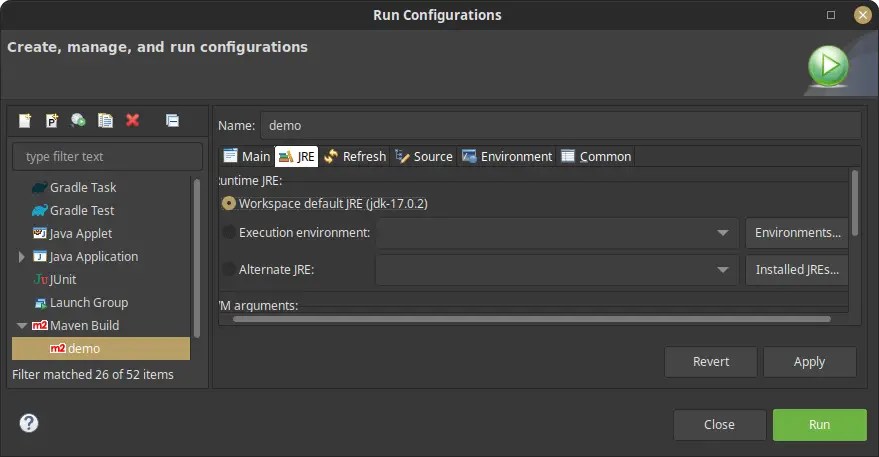
Next, include in the Main Tab the goal “compile” or “install” and your project will build using Java 17. Post Views: 432 |
【本文地址】